There is a unique and profound satisfaction that comes from making something beautiful and functional for your own home. Every time you walk into a room and see a project you’ve completed, there’s a little spark of pride, that quiet, happy whisper of, “I made that.” And when it comes to high-impact DIY projects, sewing your own curtains is at the top of the list. It’s a chance to get exactly the fabric, style, and length you want, often for a fraction of the cost of custom window treatments.
I remember my first foray into curtain making. I had a vision, a beautiful bolt of fabric, and a very basic sewing machine. I muddled through, but I also experienced a fair bit of frustration trying to cut a straight line on my living room floor and pressing hems with a travel iron. I quickly learned that while passion is the fuel, the right tools are the engine that makes the creative journey smooth and joyful.
Whether you’re a curious beginner or a seasoned seamstress looking to tackle drapery, having the right toolkit is the difference between a frustrating struggle and a delightful, successful project. So, let’s clear off the crafting table and lay out the essential tools you’ll need to create the curtains of your dreams.
Must-Have Tools for Efficient Sewing
Before you even thread your machine, the majority of your time making curtains will be spent on two things: measuring and cutting. Getting these steps right is 90% of the battle, and these foundational tools are your absolute non-negotiables.
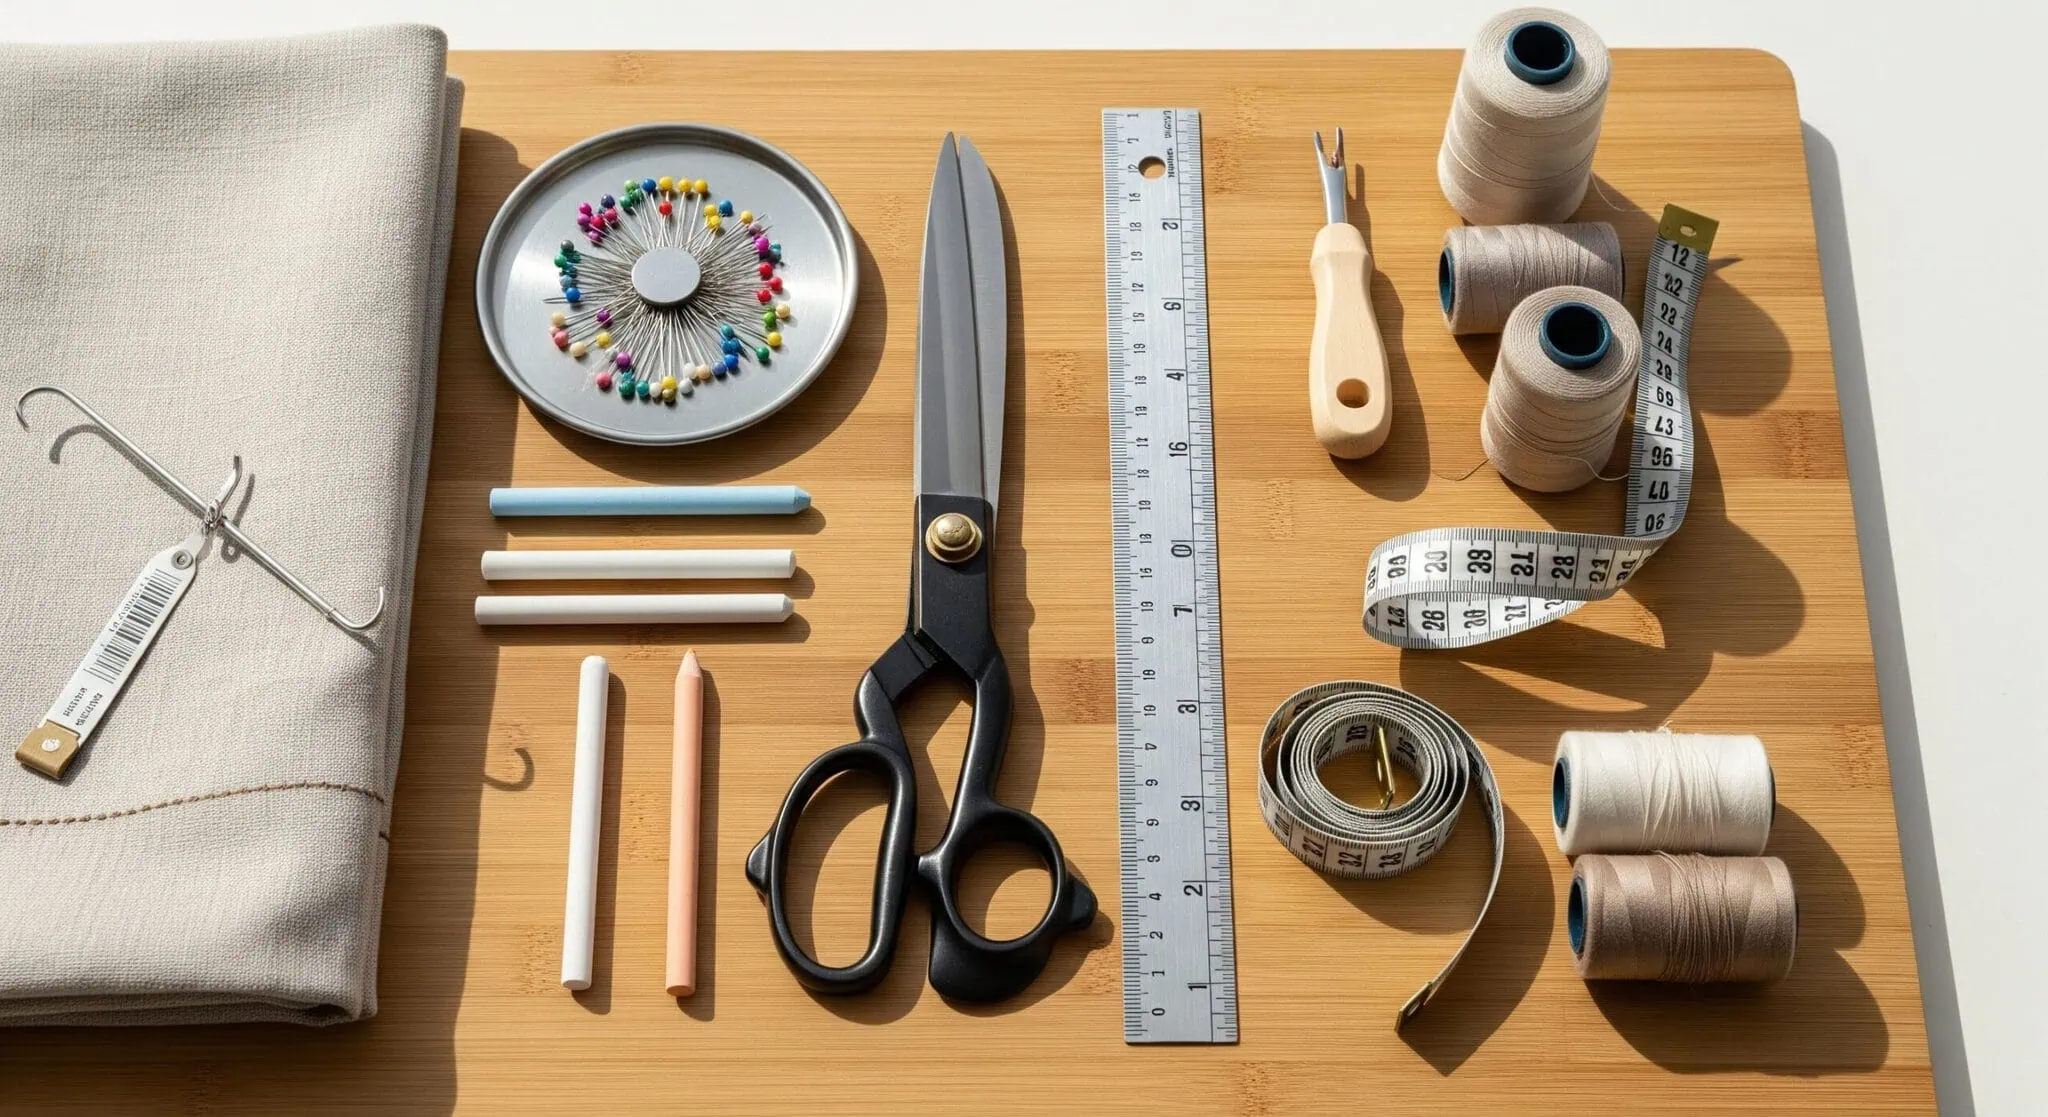
For Measuring and Marking:
- Long Metal Ruler or Yardstick: A standard 12-inch ruler won’t cut it here. You need a long, rigid straightedge (at least 36 inches) to draw perfectly straight cutting lines and measure hems accurately on large pieces of fabric.
- Flexible Measuring Tape: Essential for measuring the curves of a bay window or the dimensions of the fabric once it’s off the cutting table.
- Seam Gauge: This small, sliding ruler is a lifesaver for measuring and pressing consistently accurate seam allowances and hems.
- Fabric Marker: A good tailor’s chalk pencil or a disappearing ink fabric pen is crucial for marking your lines. Always test it on a scrap of your fabric first to make sure it removes cleanly!
For Cutting:
- High-Quality Fabric Shears: This is an investment you will never regret. These scissors should be reserved for fabric only. Seriously. Put a tag on them, hide them from your family—do whatever it takes! Using them on paper or anything else will dull the blades instantly.
- Rotary Cutter and Self-Healing Mat: If you plan to sew regularly, this combination is a game-changer for achieving perfectly straight, clean cuts, especially over long lengths. A large mat (24×36 inches or bigger) is ideal for drapery projects.
For Pinning and Pressing:
- Straight Pins: Glass-head pins are my favorite because they won’t melt if you accidentally graze them with your iron. You’ll need plenty of them. For very thick or delicate fabrics like velvet, Wonder Clips are a fantastic alternative that won’t leave holes.
- A Good Steam Iron and Ironing Board: I can’t stress this enough: your iron is just as important as your sewing machine in sewing. Pressing your seams at every step is the secret to a crisp, professional finish rather than a puffy, “homemade” look.
And of course, the basics: a trusty seam ripper (consider it your ‘undo’ button, not a sign of failure!), high-quality thread that matches your fabric, and a few hand-sewing needles for finishing touches.
Finding the Right Sewing Machine for Drapery Projects
The vast array of sewing machines on the market can be intimidating, but here’s a secret: for making curtains, you don’t need a top-of-the-line machine with hundreds of decorative stitches. What you need is a dependable workhorse.
When choosing a machine for drapery projects, look for these key features:
- A Powerful, Sturdy Motor: Curtains, especially when lined or made from heavier fabrics like velvet or canvas, can be thick and heavy. A machine with a strong motor will be able to punch through multiple layers without struggling or skipping stitches.
- Excellent Straight Stitch Quality: This is the stitch you will use for 99% of your project. It needs to be consistent, balanced, and reliable.
- Good “Throat” Space: The throat is the area to the right of the needle. A machine with a larger throat space will make it much easier to manage the bulk of your curtain fabric as you sew.
- The Ability to Use a Walking Foot: This is my number one recommendation for a machine accessory. A walking foot has a set of feed dogs on the top that work in tandem with the machine’s feed dogs on the bottom, feeding all layers of your fabric through evenly. This prevents the layers from shifting and is absolutely crucial for sewing long seams, matching patterns, or working with slippery or thick fabrics.
Whether you choose a sturdy mechanical machine or a computerized one, prioritize reliability and strength over a dizzying array of bells and whistles. A well-maintained, entry-level machine from a reputable brand will serve you far better than a flimsy machine that boasts 500 stitch options you’ll never use.
Accessory Recommendations for Perfectionists
Once you have your essentials covered, there are a few extra tools and accessories that can take your curtain-making skills from good to great. These are the little things that help you achieve that perfectly polished, professional finish.
- A Blind Hem Foot: This specialized presser foot, combined with your machine’s blind hem stitch, allows you to create nearly invisible hems. It’s a fantastic way to elevate the look of your finished curtains.
- Pattern Weights: These are small weights used to hold your fabric or pattern pieces in place on your cutting mat. They’re a great alternative to pins, especially on delicate fabrics where you want to avoid leaving holes.
- A Hot Hemmer or Hemming Gauge: This brilliant tool is a heat-resistant ruler that lets you measure, fold, and press your hems all in one go. It’s a huge time-saver and ensures perfectly straight, crisp hems every time.
- A Point Turner: This simple tool, which often looks like a small plastic stick with a pointed end, is invaluable for poking out corners to make them perfectly sharp and square. (The blunt end of a chopstick also works in a pinch!)
- Good Lighting: Don’t underestimate the power of good light! A dedicated task lamp that illuminates your sewing area will reduce eye strain and help you sew more accurately.
Organizing Your Sewing Space: Tips for Productivity
A cluttered sewing space can lead to a cluttered mind and frustrating mistakes. Creating an organized, efficient workflow will make your creative time so much more enjoyable and productive.
- Designate Your Zones: Set up your space with a logical flow: a large, clear cutting area (a dining table can work!), your pressing station (iron and ironing board), and your sewing machine station. Arranging them in a triangle can minimize the steps you need to take between tasks.
- Master Your Tool Storage:
- Pegboards are amazing! I finally mounted a pegboard above my sewing desk a few years ago, and it was a revelation. Having my rulers, shears, and rotary cutters visible and within easy arm’s reach instead of buried in a drawer is a massive time-saver.
- Use drawer dividers to organize small notions like presser feet, bobbins, and marking tools.
- Clear jars or containers are perfect for things like Wonder Clips, buttons, and other small bits.
- Tame Your Fabric Stash: To avoid deep-set creases, try rolling your fabric onto leftover cardboard tubes from wrapping paper or paper towels. Store them on a shelf or in a large bin. For smaller pieces, folding them neatly and “filing” them vertically in a drawer or bin works well.
- Create a “Current Project” Tray: When you’re working on your curtains, keep all the necessary components—the fabric, thread, specific presser foot, and instructions—together on a tray or in a designated project box. This keeps everything contained and makes it easy to pick up where you left off.
Your Creative Journey Awaits
Assembling the right toolkit for sewing is an act of kindness to your creative self. It paves the way for a process that is less about struggle and more about the joy of creation. With these essential tools, a dependable machine, and an organized space, you are fully equipped to embark on the wonderfully rewarding journey of crafting your own curtains. You’ll not only beautify your home but also infuse it with your own personal touch and the immense pride of a project beautifully made.
If this guide has helped you feel more prepared to tackle your own drapery projects, please share it with your fellow crafters and DIY enthusiasts! Now, go forth and create something wonderful!