Have you ever had this experience? You spend weeks searching for the absolute perfect curtains. You find a fabric you love, a color that makes your heart sing, and you bring them home, full of excitement. You hang them up, step back to admire your work, and… something just feels a little off. The room doesn’t quite have that polished, magazine-worthy look you were dreaming of.
If this sounds familiar, I’m here to let you in on a little secret I learned early in my design career: how you hang your curtains is often far more important than the curtains themselves. It’s one of those simple, foundational tricks that professional designers use to instantly elevate a space, and it can make an incredible difference in your own home. With a few easy adjustments, you can make your ceilings feel taller, your windows look grander, and your entire room feel more spacious and luxurious.
So, let’s pull back the curtain on these designer secrets and walk through the simple rules for hanging curtains for maximum, show-stopping impact.
Selecting the Right Hanging Hardware
Before we even think about height and width, let’s talk about the foundation of any good window treatment: the hardware. Choosing sturdy, appropriate hardware is like choosing a good quality frame for a piece of art—it supports, enhances, and completes the look.
- The Rod Itself: Flimsy is your enemy here. Look for a curtain rod with a substantial diameter, at least 1 inch thick. A skinny rod will not only look unsubstantial but is also more likely to sag under the weight of your curtains. The material and style should complement your room’s decor—sleek brushed nickel for a modern space, warm wood for a traditional or rustic room, or classic black for a versatile look.
- The Brackets: These are the unsung heroes of your window treatment. They need to be sturdy enough to support the full weight of your rod and curtains without budging. Equally important is their projection—the distance they stick out from the wall. Ensure they project far enough so your curtains can hang freely without getting snagged on a deep windowsill or trim.
- The Finials: These are the decorative end caps on your rod. They serve the practical purpose of stopping your curtain rings from sliding off, but they’re also a great place to add a touch of personality. Just be sure their scale is appropriate for the rod and the room.
- Rings, Grommets, or Pockets? How the curtain attaches to the rod affects both form and function. Curtains on rings tend to glide the most smoothly, making them great for frequently used windows. Grommet-top curtains create a modern, uniform wave. Rod-pocket curtains, where the rod slides through a sewn channel, have a more casual, gathered look but can be a bit more difficult to open and close.
Pro Tip: A common mistake is buying a rod that is the exact width of the window frame. Always, always buy a rod that is significantly wider than your window. Why? Keep reading!
Determining the Ideal Height and Width
This is it. This is the core secret that will change your curtain-hanging game forever. If you remember nothing else, remember these two words: High and Wide.
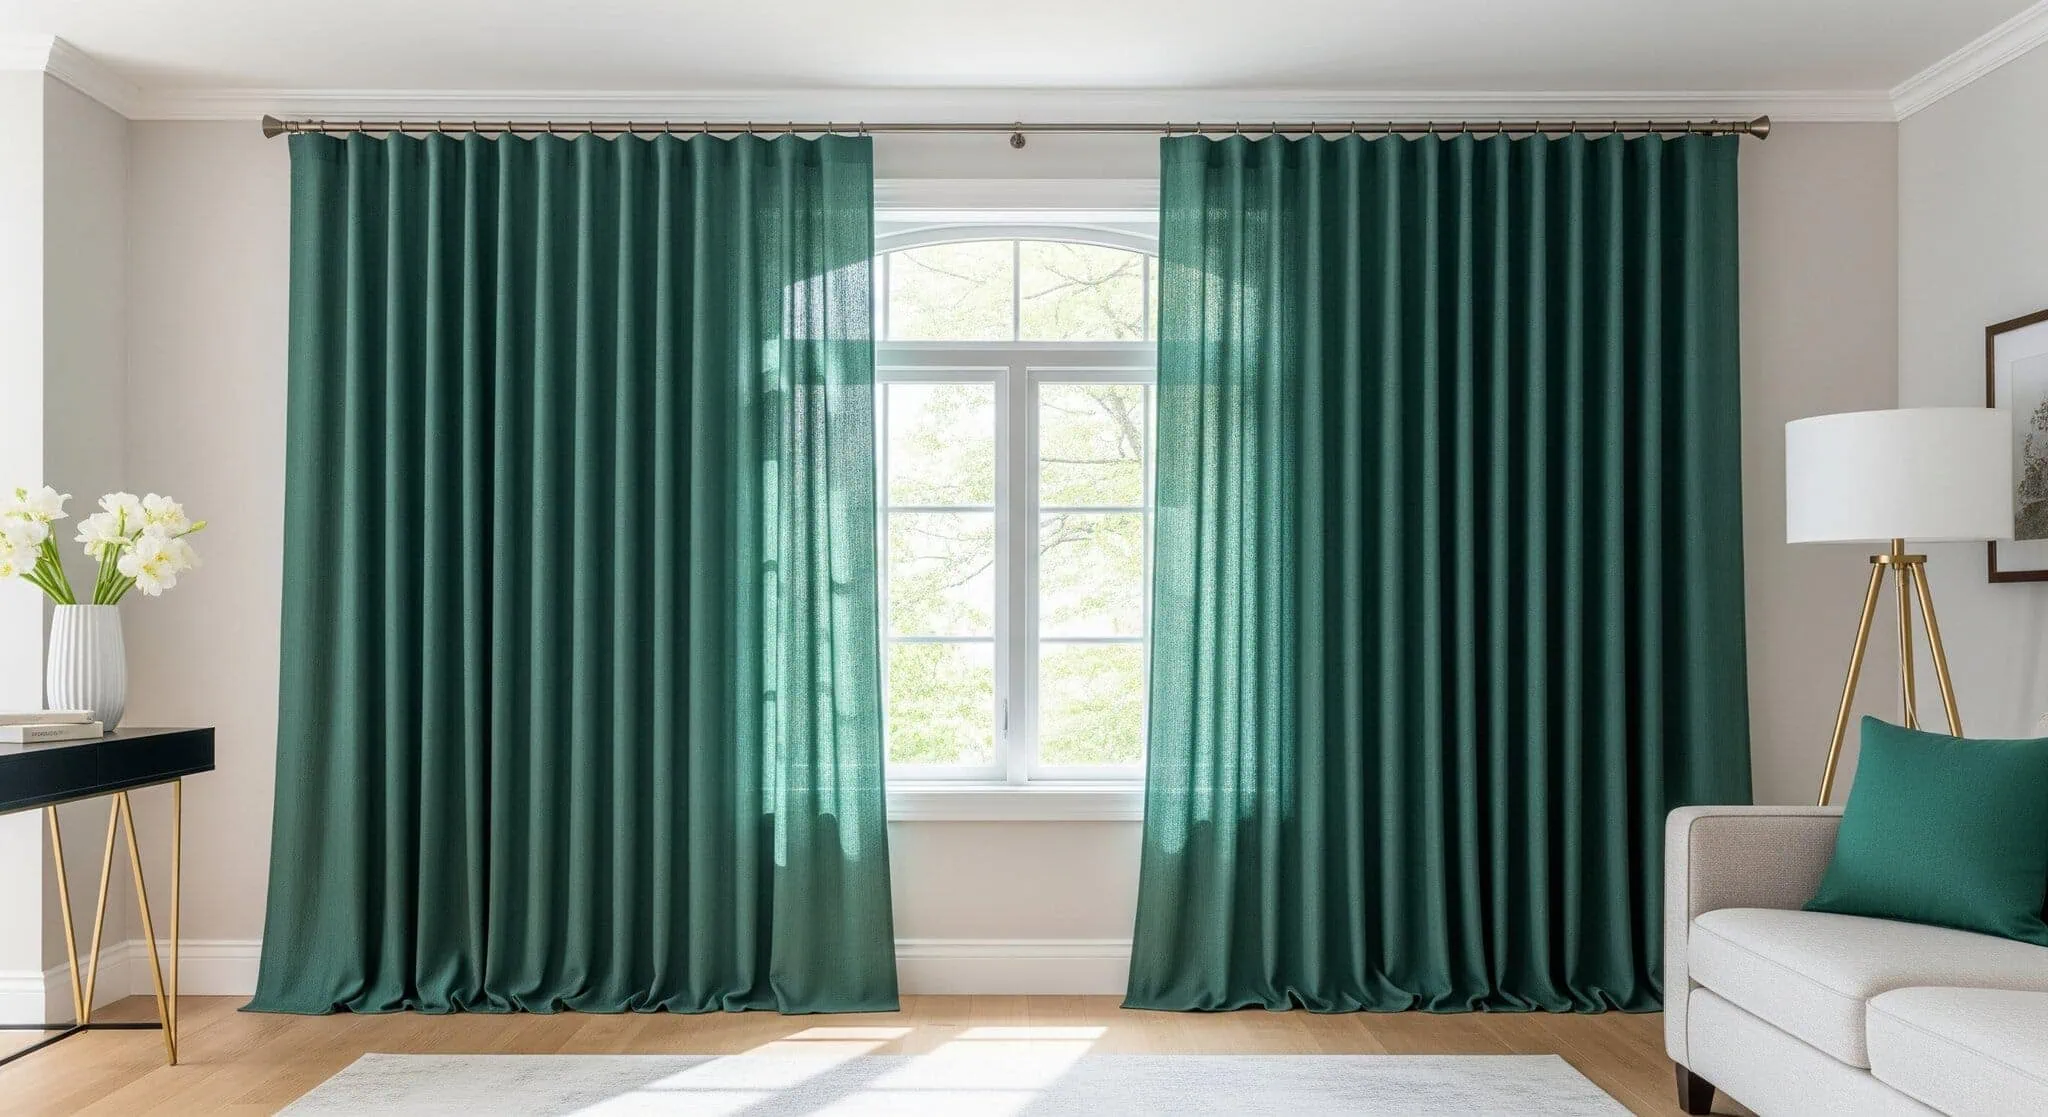
THE HEIGHT RULE: Go High!
The most common mistake people make is mounting the curtain rod directly on top of the window frame. This visually squashes the window and makes the ceiling feel lower.
- The Guideline: Mount your curtain rod at least 4 to 6 inches above the top of the window frame.
- For Maximum Drama: If you have the space, mount the rod even higher—about halfway between the top of the window frame and the ceiling (or just a few inches below your crown molding).
- The “Why”: This simple trick draws the eye upward, creating a powerful illusion of height. It instantly makes the ceilings feel taller and the entire room feel grander and more airy.
THE WIDTH RULE: Go Wide!
The second most common mistake is not extending the rod far enough beyond the sides of the window.
- The Guideline: Your curtain rod should extend 6 to 12 inches beyond the window frame on EACH side. So for a 40-inch wide window, you’d want a rod that is at least 52 inches wide, and ideally closer to 64 inches.
- The “Why”: This has two incredible benefits. First, it tricks the eye into thinking the window itself is much wider and more substantial than it actually is. Second, and this is crucial, it allows you to pull the curtains completely off the glass when they’re open. The curtain panels “stack back” against the wall, not over the window, allowing every possible ounce of natural light to flood into your room.
THE LENGTH RULE: Go Long!
Unless there is a radiator or a deep built-in preventing it, your curtains should almost always touch the floor.
- The Ideal Lengths:
- The “Kiss”: The curtain hem just skims the surface of the floor. This is a sharp, tailored look.
- The “Puddle”: The curtain has 1 to 3 inches of extra fabric that pools elegantly on the floor. This creates a more romantic, luxurious feel.
- What to Avoid: The “high-water” look, where curtains hover awkwardly a few inches above the floor. This visually chops up the wall and makes the room look shorter and the curtains feel like a cheap afterthought.
Maximizing Aesthetic and Functional Appeal
Once you’ve mastered the “high and wide” principle, a few finishing touches will ensure your curtains look truly custom and luxurious.
- Fullness is Everything: Skimpy curtains look sad. To achieve a full, plush look with beautiful, deep folds, you need adequate fabric.
- The Rule of Thumb: The combined width of your curtain panels should be 2 to 2.5 times the width of your window. For example, for a 40-inch window, you would want at least 80 inches of total curtain width. This ensures that even when closed, your curtains have a lovely, rich fullness.
- “Train” Your Drapes: Have you ever wondered how curtains in magazines hang in such perfect, uniform folds? They’ve been trained! After you hang your new curtains, arrange the fabric into neat, even pleats. Then, take a few loose strips of fabric or ribbon and gently tie the pleated panel together in three places (top, middle, bottom). Let them hang like this for two or three days. When you untie them, the fabric will have “learned” the folds and will hang beautifully.
Trouble-Shooting Common Hanging Issues
In the real world, not all walls and windows are perfect. Here’s how to handle a few common issues.
- Problem: My rod is sagging in the middle.
- Solution: Your rod is either too flimsy, or you haven’t used enough support. For any rod spanning more than 4 or 5 feet, you absolutely must use a center support bracket to prevent bowing.
- Problem: My floor is uneven.
- Solution: This is very common in older homes! Always use a level to install your curtain rod rather than measuring down from the ceiling, which may also be uneven. When it comes to curtain length, hang them to “kiss” the floor at its highest point. It’s better to have a small puddle in one area than a visible gap in another.
- Problem: My window is in a tricky corner.
- Solution: Don’t despair! You can buy special corner connectors that allow you to join two curtain rods at a 90-degree angle. Alternatively, for a very dramatic and cohesive look, you can run a single curtain rod along the entire length of the wall, treating both the window and the corner as a single design element.
The Transformation Awaits
It’s amazing how these few simple rules—hang them high, wide, and long—can completely transform the look and feel of a room. It’s the difference between a space that feels just “okay” and one that feels thoughtfully designed, elegant, and welcoming. This isn’t just about covering a window; it’s about framing a view, enhancing architecture, and making your home the most beautiful version of itself.
I encourage you to take a look at your own curtains. Could they go a little higher? A little wider? Give it a try! You’ll be stunned at the impact.
If you found these designer secrets helpful, please share this post with anyone who is ready to elevate their home, one window at a time!